| Click here to show toolbars of the Web Online Help System: show toolbars |
![]()
Databound
List / Drop-Down Menu Wizard
Overview
This wizard builds a list box or drop-down menu input control, the contents
of which are loaded from a database file. Here are examples:
The wizard builds the necessary RPG code and HTML code. The RPG code involves declaring the database file and loading the input control's selectable options from this file.
You can start this
wizard from the Wizards
Menu or call it up from the Database Repository's
Field Properties or from the Insert RPG Field Wizard.
The generated content will be created at the caret insertion point. Most of the time,
you will want to place the list box or drop-down menu within an HTML form.
Name
This represents the HTML input control name. If you are creating a sticky input field, this also represents the RPG variable associated with the input control.
Type
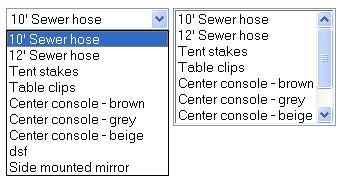
You can choose between creating a list box and a drop-down menu. A list box looks like this:
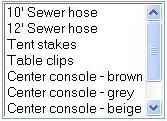 , while
a drop-down menu looks like this:
, while
a drop-down menu looks like this: ![]()
The main difference is the height (or size) of the control. The functionality and the generated HTML/RPG code is virtually the same for both a list box and a drop-down menu.
Height
Height specifies the number of rows for the control to display at one time. This is relevant only to list boxes.
Sticky
Sticky fields select an initial value or option based on an RPG variable. The RPG variable is named the same as the input control itself. This allows you to create pages that remember user entries from one page load to another, and lets you dynamically initialize input controls with RPG calculations. Sticky Input fields are similar to B (both input and output) fields in DDS Display File definitions. The generated code for making sticky list boxes or drop-down menus involves dynamically toggling the Selected attribute of the <OPTION> tags.
If sticky is not selected, the control is created as a blank input field, which means the option initially selected will be the first option in the list box or drop-down menu.
Maximum number of records to load
Maximum number of records limits the number of records to load into the control from the database file for safety. You should not use databound list boxes or drop-downs with files that have an enormous number of records due to performance reasons. The file used should have a limited number of records.
The maximum number of records field serves as a precaution, especially for when you are just "playing" in the IDE. However, if you are sure the database file being used always has a reasonable number of records to load at one time, you can select the "No Max" option.
For files that do have a lot of records, you should use the Record Selection Wizard instead of a databound list box or drop-down menu.
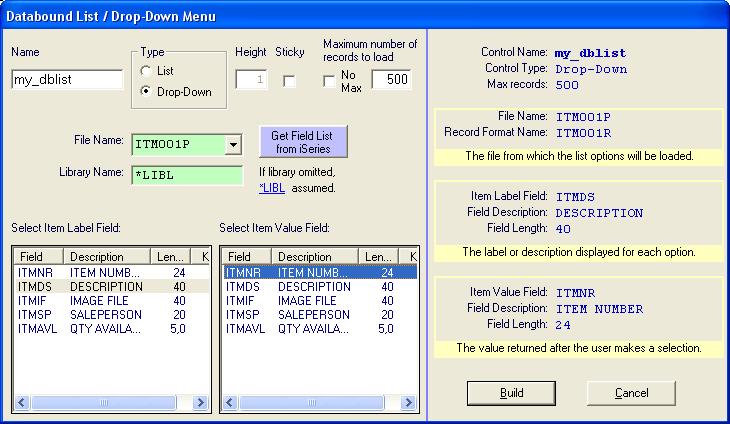
File Name
Type in or select the name of a database file to use for loading the control's options. If you have retrieved the field definitions for this particular file before, the available fields will automatically be populated into the Item Label Box and the Item Value Box from the local database repository; otherwise, you must click the blue button to get the field list from the iSeries.
Library Name
The Library Name field is used for locating the specified physical or logical file when the "Get Field List from iSeries" button is used. It is recommended that you leave this field blank or as *LIBL, in which case the compile-time library list defined under Tools -> Options is used. To change the library list on the fly, click on *LIBL.
Item Label Field
The Item Label Box is used for selecting the field whose value will be displayed as each option is loaded into the list box or drop-down menu. The box shows you all available database file fields, of which you must highlight one. Generally, a description field should be selected.
Item Value Field
The Item Value Box is used for selecting the field whose value will be passed to the server when a particular option is selected. The box shows you all available database file fields, of which you must highlight one. Generally, a key field should be selected.
Once you have filled out the appropriate wizard parameters, the Build button will become enabled. You will be able to review the details of your selections on the right side of the wizard.
When you press Build, the wizard will generate the necessary code and insert it into the active document or the active dialog, depending on where you requested the wizard from.
Profound
Logic Software, Inc.
www.ProfoundLogic.com
(937) 439-7925